Wednesday, July 24, 2013

Zen

     For several years now, I have been seeking, in a sort of secondary way, answers.  I've been seeking answers to problems and issues that lie quietly, smoldering in the deepest, darkest parts of my mind.  They're the same kinds of problems and issues that are probably smoldering in your very head, for they are very human questions.  Why am I here?  What do I do?  How do I make myself happy, and what is to be happy anyways?
     At first I tried to seek those answers in books; in old books.  I tried to read Walden.  Thoreau is supposed to be the grandmaster of those who enjoy the outdoors, but I have slowly formed the opinion that he was at least slightly delusional, and honestly a poor writer.  I don't think I can forgive him for dedicating a few pages to buying shingles.  I tried Emerson next, and didn't get very far.  I read some Muir, and while I liked his writing style for a change, it wasn't providing answers for the questions I wanted answers for.
     For college I managed to actually read a few primary sources of Eastern religion and philosophy.  I read the Bhagavad Gita and the Tao Te Ching, and greatly enjoyed them.  I think they started to open my mind in the right direction, and I imagine I will reread them in the future to gain previously missed nuggets of wisdom.  But they still weren't really taking me where I wanted to go.
     Unintentionally, I began to find some direction in music.  Although music had never really been a huge part of my life, a few years into college I began to discover music that I truly liked.  It was music that no one else that I knew really liked.  I was liking it because, well, I liked it.  I didn't feel like I had to like it.  I didn't feel like I had to like it in the same way I'm supposed to like Thoreau because I like the woods, or that I'm supposed to gain great wisdom from the Tao Te Ching because Eastern philosophy intrigues me.  It spoke to me on a level I still don't quite understand.  But it's not really telling me enough.  Bob Dylan, Neil Young, Woody Guthrie and Lead Belly aren't telling me how to live my life.  They're giving me pointers, but they are outdated, too topical, too narrow.  They're just helping me realize the answers were inside of me the whole time.
     Then I started to work on bikes.  I began to look beyond the computer screen, beyond the written page, and look at steel, aluminum and rubber.  I stretched my hands, feebly picked up a wrench, and found I knew how to use it.  I was born to use it, my genes know how to use it, and I was raised to use it.  I understand it.  I understand it without understanding how I understand it.  This feeling was mostly new to me:  most of the things I've liked in my life have partly appealed to me because they were mysterious, and I wanted and needed to figure them out.
     I've recently started reading Robert M. Pirsig's infamous Zen and the Art of Motorcycle Maintenance.  I picked it up partly on whim, partly inspired by reading and liking an excerpt from it years ago while backpacking in Utah's Uinta Mountains for college.  I wasn't really sure what to expect.  I guess every noun in the title appeals to me:  Zen, Art, Motorcycles and Maintenance.  I'll admit so far it hasn't really been what I thought it would be.  It's been surprisingly easy for me to read, mostly, and has introduced some interesting subjects.  But perhaps most importantly is that it's speaking a language I understand:  the language of the mechanical world.  I get it.  Most of it anyways.  It'll need another read sometime in my life, for sure.  Not that I'm done with it now, I'm not even quite halfway through the book.  But a paragraph stood out to me tonight, a paragraph that I think perfectly describes a feeling I have been thinking of for several months now:

"What's really angering about instructions of this sort is that they imply there's only one way to put this rotisserie together -- *their* way. And that presumption wipes out all the creativity. Actually there are hundreds of ways to put the rotisserie together and when they make you follow just one way without showing you the overall problem the instructions become hard to follow in such a way as not to make mistakes. You lose feeling for the work. And not only that, it's very unlikely that they've told you the best way."
page 166

     I've preached to my fiancee Keri for a while now that what I do has an artistic quality.  I wasn't exactly sure how to describe it or even why I felt this way, but I knew I was right.  Talent can't be conveyed and transmitted from a book of instructions or in a manual.  Sure, text can help give direction where intuition fails, but it can't encapsulate the entirety of what is needed to do it well.  Something unexplainable resides within individuals such as myself, something that allows us to take up tools and use them to do things that most others can't.  And the beauty of it is that it doesn't just pertain to mechanics:  the same is true for musicians, artists, writers, athletes, philosophers, teachers, programmers, engineers, and just about anyone else who does something and does something well.  You can't teach a writer to become Stephen King, just as much as you can't teach someone to have an intuitive grasp of what they're trying to do.  It's born in us, and that is what makes it art.
     That same art was in my dad, it's in me and my brother, and we have to work hard to keep that alive.  I'm finding some of the answers I've been wanting in this book, and it is an indescribably happy experience.  To anyone else reading this who considers themselves even somewhat mechanically inclined, or at least interested, I feel I can recommend Zen and the Art of Motorcycle Maintenance even at this point, having not finished it yet.  It's a good read.

Tuesday, July 16, 2013

The Sturmey & the Archer, Part 2

     In my last post I talked mostly about wanting a Sturmey-Archer AW three-speed hub and then actually acquiring one.  Now, I'm going to relate my experience rebuilding the hub.  Or rather, for now, the disassembly of the hub.
     I'll start by saying I didn't go into it completely blind.  As I had mentioned, I had a little experience rebuilding the actual inner workings using a hub a coworker had acquired and disassembled.  He had found a wonderful PDF scan of the "Sutherland's Handbook of Coaster Brakes and Internally-Geared Hubs" section for the AW three-speed hub on Sheldon Brown's website.  I had tried making sense of the written guide on Sheldon Brown's website, but found the pictures and exploded view of the Sutherland's scan to be exactly what I needed.  I disassembled my hub without the guide, as that is rather easy, and only occasionally referenced it during the rebuild, to make sure I oriented things in the proper way.  I heavily recommend the Sutherland's scan for any internal work.

Top Left:  Non-drive hardware.
Top Right:  Lubrication port, hub flange, and sprocket.
Bottom Left & Right:  Drive-side assembly and hardware.
All prior to cleaning.
Taken July 10, 2013
     I was, of course, very anxious to start disassembling it and tried to start in my apartment but did not get very far.  I was able to remove the snap ring which keeps the sprocket and sprocket spacers on, along with the dust cap under that, but that was all I could remove.

Left to right:  Drive side hardware, snap ring, both sprocket spacers, the sprocket itself, and the hub.
Taken on July 11, 2013
     The hardest part of disassembling one of these hubs, in my opinion, is removing the ball ring.  The ball ring is the part of the inner assembly that actually threads into the hub shell, holding it all together.  These are almost always incredibly tight, and the commonly accepted procedure is to actually place a punch on one of the two notches cut into the ball ring and hammer it loose.  Once loose, a lock ring spanner or your fingers can unthread it.  The problem is that it is also recommended to have the hub laced to a rim to do this, to keep the hub secure and in place.  Otherwise, you need a vise to clamp the hub shell as you whack away on it.  I only had the bare hub, and no vise.  My eager-to-help fiancee Keri tried holding the hub as I pounded on it but to no avail; these things are just tight.  I'd have to bring it into work to use the vise there.
     I had dowsed the hub with WD-40 at home to try and lessen the friction on the threads.  It didn't work.  The next day in the shop, I planted the hub in our vise, with the handy aluminum jaw covers so as to not dent or scratch the steel shell, and went at it with a hammer and screwdriver.  Nothing.  I did this a few times throughout the day and got nowhere.  I was starting to get frustrated.  Every time I beat on it, the whole hub would shift backwards in whichever direction I was hammering.  I tried more WD-40:  nothing.
     Finally I checked my phone for an old text message with my fellow Sturmey-crazy coworker and noted he said to use PB Blaster, a really effective penetrating lube.  I sprayed some of this stuff on the hub, let it sit for less than a minute, and anxiously put my screwdriver and hammer to it.  Nothing moved.  For a moment I was disappointed, when something flared up in the back of my mind.  Nothing moved.  The hub did not shift backwards.  It stayed exactly where it was in the vise.  This meant that the force of my hammer was breaking the friction of the threads, and not just moving the hub within the vise.  Eureka!  With a few more whacks and a lock ring spanner, I triumphantly unthreaded the assembly.  What a feeling!

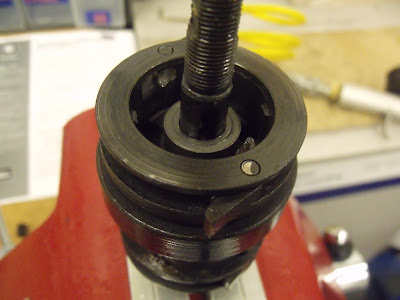
The vised hub, with PB Blaster visibly resting on the ball ring.  Note the shallow notch on the
 right side that I was hammering into.
Taken on July 11, 2013
     I'll take a quick moment to note that the ball ring actually taught me about something I didn't know existed:  double start threads.  I looked it up and was amused to discover double start threads are basically a pair of threads that can start opposite or next to eachother.  They are used when you want a piece to thread quickly over a short distance, but you want it to also be a very precise threading.  With a "normal" single start thread, you can achieve this by broadening the pitch of the threads, but then you have a very clumsy or slopping threading.  I just thought this was neat, as I'd never heard of anything like it.

A little hard to see, but you can barely make out the double start thread on the ball ring.
Taken on July 11, 2013
Removing the inner assembly.
Taken on July 11, 2013
Left:  The inside of the hub shell.  Note the machined surfaces for the ratcheting pawls.  And the glob of grease.
Right:  The removed inner assembly, vised and ready to be taken apart.
Taken on July 11, 2013
     The first thing to do with the removed assembly was to unthread the drive side cone and locknut.  Underneath the cone is the clutch spring and its cap.  The clutch spring puts pressure on the clutch, wanting to return to the high gear.  When you shift down and pull cable, you're pulling against the spring.  This means that when you do the opposite and shift up, into higher gears, you're letting the spring push the clutch back to where it wants to go.

The clutch spring and its cap, free at last.
Taken on July 11, 2013
     Thankfully the clutch spring is not attached to anything and just rests inside of the assembly.  It's easily removed.  Next is the driver, one of the more uniquely shaped parts.  The driver has quite a few jobs.  First and foremost, the driver is what the sprocket connects to, hence giving it its name.  It is also, in a sense, a giant cone, resting on a third set of bearings inside the ball ring, which we'll see later.  Lastly, the clutch interfaces directly with the driver in the middle gear.

The driver.  Note the notches cut in the lower half for the clutch and the three grooves on
 the top half which the sprocket slides onto.
Taken on July 11, 2013
     The driver is also kind of unique because it is both a cup and a cone.  It is a cup for the axle, and a cone for the inner assembly.  You don't really find that very often.  The nefarious ball ring holds the bearings that the driver rests on.  This set of bearings is what allows the hub to freewheel, such as when coasting and not pedaling.  Aside from also attaching the entire inner assembly onto the hub shell, as mentioned before, it also has machined surfaces on the inside for the first pair of ratcheting pawls found in the assembly.

The ball ring, named so because it houses the third set of ball bearings in the hub.
Taken on July 11, 2013

The machined surfaces for ratcheting, on the inside of the ball ring.  Similar to the inside of the hub shell, as seen above.
Taken on July 11, 2013
     Now we are starting to get to the good stuff!  Next is the gear ring, which also has a pair of pawls to interface with the machined surfaces of the ball ring.  But perhaps more importantly, the inside of the gear ring is toothed and meshes with the four planet gears on the outside of their orbit, while the sun gear of the axle meshes with them on the inside.  It is one of the three parts that comes together to create the planetary gear system that makes this whole thing actually work.  If you're confused on how the planetary gear system actually works, don't fret.  I will explain that in the next post.

The outside of the gear ring, from the top.  Note one of the two pawls, which interfaces with the inside of the ball ring.
Taken on July 11, 2013

The inside of the gear ring.  Pretty cool huh?  This is where the planet gears mesh.  Note the four raised "dogs" also on the inside, near the inner edges of the pawls.  These are important too.
Taken on July 11, 2013
     With the gear ring removed, we can start to see the true inner workings.  A lot of different parts are visible with the gear ring gone, and they're all very important.  First, on top is the clutch.  This plus-shaped piece of metal is what moves when you pull or release cable with the shifter.  In each of the three gears, it does something important.  I'll explain how all of that works in the following post.  For now, know the indicator chain slides into the hollow axle and threads into the axle key (see below), which then allows the clutch to move back and forth inside of the assembly as you use the shifter.

The small plus-shaped assembly is the clutch.  Note how it is interfacing with the raised gear pins.  This is
 crucial to your high gear.
Taken on July 11, 2013
The four pieces that come together to become the clutch.  Clockwise, starting from the top left:  thrust ring, axle key, clutch sleeve, and the clutch itself.
Taken on July 11, 2013
     Underneath the clutch is the planet cage.  In a way, this is where it all begins.  The planet cage houses the planet gears, which are between the sun gear of the axle, and the gear ring introduced above.  On the bottom of the planet cage are the second pair of pawls, which interface with the hub shell.

The planet cage.  Note the planet gears and the raised pins which secure them.
Taken on July 11, 2013
The planet cage and removed planet gears.  The gears are so precisely machined, you can't help but love them.
Taken on July 11, 2013
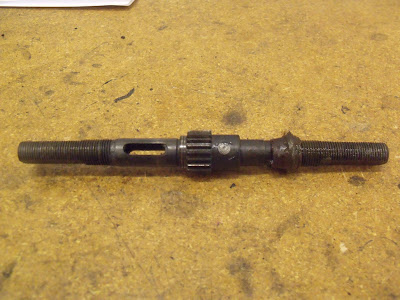
     Finally, with the planet cage and planet gears gone, all that remains is the bare axle.  In the middle of the axle is the sun gear, which meshes with the planet gears which mesh with the gear ring.  It is pretty important in all of this.  The axle also has a slot milled into it, for the axle key component of the clutch to slide back and forth within.  Interestingly, on this axle there was a rather thick glob of grease hiding beneath the planet cage.  That was wiped off.

The final part:  the bare axle.  Note the central sun gear and the slot which the axle key slides up and down, thus moving the clutch.  Oh, and the extraneous glob of grease.  Ew.
Taken on July 11, 2013
     With all of the parts disassembled, I set them all in the shop's parts cleaner and let them soak overnight.  These machines actually don't run on a lot of grease, which may seem surprising.  Truthfully, all of the grease is with the bearings, as usual.  The inner assembly uses a high quality oil as a lubricant.  Anything with ratcheting pawls typically doesn't use a grease, as the grease tends to not let the pawls do their job.  That being said, the inner parts were not that dirty and I could have put them all back together right there and no one would ever know the difference.  But for my own satisfaction, I wanted to clean everything and try to start over from scratch, or at least as close to scratch as I could.  After letting everything soak overnight, I hit the parts with the ultrasonic waves a few times, used a few cans of elbow grease, and finally had a bin of clean and gleaming parts.  Excited, I took everything home to reassemble at my leisure.
     And so, the next post will detail the reassembly, and most interestingly of all, I will attempt to explain how these machines work.  Enjoy.

Sunday, July 14, 2013

The Sturmey & the Archer, Part 1

     It's a great thing when you can turn an idea into reality.  In fact, I think it's a good feeling just knowing you can turn an idea into reality.  It's kind of a special thing, simply because it's not always possible.  Money, resources, time, knowledge:  these can all be hurdles in realizing an idea.  I know about this all too well, as I have quite a backlog of dormant or completely spoiled projects and ideas.
     But lately I got lucky with one.  Ever since I got bit by the three-speed bug, as I described in this post, I've wanted to get my hands on my own Sturmey-Archer hub, rebuild it for the hell of it, lace it to a wheel and create an upright comfort bike.  For a few years now the idea of building up a cruiser has been bouncing around in my head, but there was no great desire to see it through.  This all changed when a coworker rebuilt an old Sturmey-Archer AW three-speed hub.
     I've got to be honest, two thoughts popped into my head.  On one hand I was surprised because I had created the idea in my head that three-speed hubs were too complex for me to work on and thus floated in the ethereal realm of things I should never try to actually fix.  On the other hand, I thought, "If he can do it, so can I!"  Shortly afterwards this same coworker picked up a few hubs for himself, took them apart, and we were both completely smitten with these machines.  The moment I first saw the box of cleaned parts, ready for reassembly, I fell in love.  A deep, almost forgotten part of me was stirred just from seeing the dark, precisely machined gears, shells and rings.  It reminded me of the kinds of things I would play with as a child, sneaking old "junk" parts out of my dad's things and pretending I was doing something with them.  Deep down, seeing the insides of these hubs made me very happy.
     A common saying in the world of bike mechanics is that you're only a real bike mechanic if you can build a wheel.  It's a sort of rite of passage.  I imagine half of that comes from the mystique surrounding the bicycle wheel and its importance to the bicycle itself.  I think the other half of that comes from the fact that they are a bit of a puzzle and commonly seen as complex.  But honestly, I think being able to rebuild one of these hubs is the sign of a good mechanic.  It may not make you a bike mechanic under the traditional bike culture "regime", but in my book it makes you a good mechanic period.  Just my opinion though.

One of the very first Sturmey-Archer hubs, from 1902.
Source
     Time to back up and provide some history, some of which I touched base on in the previous post talking about internally geared hubs.  The Sturmey-Archer company was formed in 1902, in Nottingham, England.  Their claim to fame from the start was the internally-geared hub.  In 1936 the AW "wide gear range" hub was introduced and proceeded to be the most widely-spread and famous of the Sturmey-Archer hubs throughout the years.  They are still manufactured today, and honestly the design has not changed as much as you may think.  Sadly in 2000, the company gave its final gasp for English air and was sold to SunRace.  The machines and tools used to manufacture these wonderful mechanisms for almost a full century were moved to Taiwan, where thankfully SunRace has been working to restore the glory and reputation of a brand which had fallen on hard times ever since the race bike craze of the seventies and eighties.  From what I've read, quality control during the final few decades of Sturmey-Archer's time in England was at an all time low, and they weren't quite living up to their name.  The modern hubs are supposed to be much nicer, although I've never worked on a bike with one.
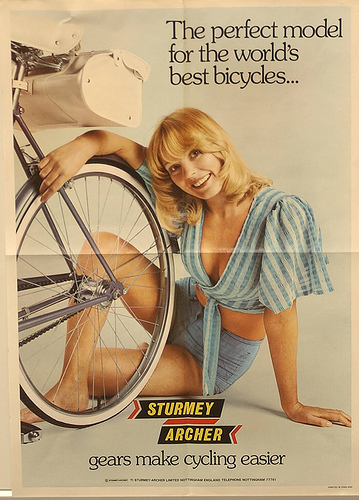
An amusing Sturmey-Archer ad.  Not sure when it is from, my guess is sometime in the seventies.
Source
     I wanted a hub of my own, and I wanted an old one.  But there was one other requirement which was most important of all:  spoke holes.  A lot of the hubs manufactured for English bikes had forty spoke holes, as this was a common spoke count in England.  Unfortunately, there just aren't a lot of forty spoke hole rims available today, especially if you want something nice or in a modern size.  They exist for tandems, but they are rare and expensive.  The most realistic solution is to simply use the original steel rim that these hubs were laced to.
     Fortunately they also made a lot of Sturmey-Archer hubs with thirty-six spoke holes, which is a spoke count that rims still come in.  I tried finding a hub in town, but I could not even find one made by Sturmey-Archer, much less the AW three-speed hub.  So I was forced to resort to unfamiliar territory:  eBay.
     There are a lot of cool bike things on eBay.  The stifled economy has undeniably forced a lot of people to make money any way they can, and parting out old bikes seems to be at least somewhat lucrative.  I had a lot of options to pick from, and it didn't take long for one particular auction to shine through.  For $27, I could get everything I'd need to get started:  a Sturmey-Archer AW rear hub, a Schwinn-branded front hub, the shifter, cable, housing, and accompanying hardware to setup the shifting system.  Just the rear hub, sometimes without even the crucial indicator chain which connects the cable to the hub, were going for similar prices so this one seemed perfect.  The only bad thing was that the auction ended at six in the morning on a day I worked.  Showing unusual resolve, I actually awoke an hour early, sat on the page for an hour and sniped the winning bid ten seconds before the auction closed.  My first ever true eBay auction and it was a great success!

Everything I got on eBay minus the shifter and cable: the AW hub, a Schwinn-branded front hub,
a pulley cable guide and a housing guide.
Taken on July 10, 2013
     I was very excited when the package came in the mail, and was glad to see the hub dirty but in good shape.  This makes for impressive before-and-after shots!  I was itching to disassemble this hub for myself, clean it, and rebuild it for my own satisfaction.  There is a lot to gain for your soul in doing this.
     In the interest of not creating enormous, "novella" length posts I'll stop here and continue the story of rebuilding it in the next post.  Enjoy.

Thursday, June 27, 2013

Keri's Motobecane, Part 3

     It is funny how the world works sometimes.  One of the bigger projects looming in my mind for the past year has been outfitting my fiancee Keri's vintage Motobecane with shifters and derailleurs, as we bought it as an improvised single speed.  Actually installing the components wouldn't be that big of a deal, mostly because it involves pretty routine procedures; the real pain would come from tracking down somewhat appropriate components.  The bike is old but I'm not entirely sure what originally came on it.  Information on Motobecanes from the early seventies is difficult to find, and honestly the scans I have found are hard to read.  Accumulating all of the parts could take some time, some money, and it eventually got shifted onto our backburner.

Keri's bike prior to operation.
Taken on June 26, 2013
     Then, cosmic energies aligned and some good fortune came our way.  One of our managers at work was given an old Schwinn World bike.  Unfortunately, the bike was in really rough shape, needing at least new tubes and tires to be rideable.  In addition to that, the bike was too tall for her.  Deciding to donate it to a local non-profit bicycle program, she brought it into work thinking it needed to be in working order to donate.  After seeing it initially, I didn't think much of it.  The frame's paint job was a bit scuffed in parts, and most of the bike's componentry weren't anything to write home about.  But something did catch my eye:  the shifters.  They were exactly the kind I needed for Keri's bike, and they were actually in pretty good shape too!
     I mentioned to my manager that bikes actually don't need to be in working order to be donated, and that I was actually interested in the shifters.  We quickly worked out an agreement where the whole bike was mine, and I would donate what I didn't use.  Sweet!  After looking over the bike some more, I soon realized that not only were the shifters useful to me, but the rear and front derailleurs were actually perfect for Keri's bike!  In one fell swoop, I had acquired nearly everything I needed to turn Keri's bike back into a multiple speed vehicle.
     After stripping the necessary parts off of the Schwinn I hung the bike up for me to deal with later.  The components are all Suntour, and I can now guess the Schwinn is from some time between 1982 and 1984.  The online scans of the Schwinn catalogs did not make it extremely clear which year the bike was from, but I am confident it lies between those years.  All of the parts were destined for a bath in the parts cleaner we have at work, for although they were in good shape they still had some dirt and grime on them.
     First I disassembled the shifters.  They are simply called Suntour stem shifters, I could find no model name for them, neither on the actual shifters themselves nor online.  This style of shifter mounts, you guessed it, directly onto the quill stem of a bicycle.  They are usually not the highest quality parts out there, because the stem shifters were considered a more comfortable version of the downtube shifters typically found on more serious road bikes.  Despite this, the nicer ones are still of more-than-adequate quality, and I got lucky here:  these are of the all-metal variety.  A lot of the stem shifters that are still around have plastic levers, or at least partly plastic levers.  Besides looking nasty, they of course are not as sturdy as the ones made completely out of aluminum.

Top:  Shots of the shifters before disassembly and going into the parts cleaner.
Bottom:  After reassembly and a bath in the parts cleaner.  Not a ton
of difference, but quite a bit of shine in the mounting bracket is noticeable in person.
Taken on June 25, 2013
     I disassembled these shifters before putting them into the parts cleaner because they function entirely on friction.  The technology behind these levers is incredibly simple and in my opinion brilliant.  In essence you have four parts, in this order:  a bolt, a plate, the lever, and another plate.  When the bolt is tightened down adequately, these two plates sandwich the lever and physics keeps the lever where you put it.  The spring-tensioned derailleur can't overpower an adequately tightened friction shifter.  There's no ratcheting, no mechanisms, no springs and tiny parts.  They're incredibly low maintenance, and you really can't go wrong with them.  But because they rely on friction, I can't afford any sort of lubricant to get onto the lever and plate surfaces.  This would of course greatly reduce the friction and I'd have to carefully and thoroughly clean the surfaces before I could expect them to work again.  So only the mounting bracket, between the levers, would go into the parts cleaner.

Top:  A couple angles of the rear derailleur, prior to being cleaned.
Bottom:  Same angles, after the parts cleaner.  Besides really shining up,
a lot of the grime was removed.
Taken on June 25, 2013
     The rear derailleur is a Suntour Honor 1100, otherwise known as the fourth style of the Honor series which began in 1968.  According to the date code on the back of the parallelogram, this particular derailleur was made in June of 1981.  Aren't date codes neat?  According to the wealth of knowledge found on the Disraeli Gears website, the Honor series was renowned for not be extraordinarily beautiful or light, but for being a durable workhorse.  Sounds like my kind of part!  It has a lot in common with my Suntour Fuji Vx S rear derailleur on my Fuji S12-S, in particular the open cage--which I love--and the styling of the logo.  This really made me excited to clean it up!

Top:  Shots of the pre-cleaned front derailleur.  Note the grime around the clamp bracket.
Bottom:  Shots of the post-cleaned front derailleur.  What a shine!  But I did
have to put some elbow grease in to break up the grime.
Taken on June 25, 2013
     The front derailleur is a Suntour Spirit, and other than the fact that this particular derailleur was made in April of 1981, there isn't much else I could find out about it.  From a few catalog scans I've figured it was a rather low end component, not to mention front derailleurs tend to be a step or two below the rear derailleur on a bike.  Regardless it feels sturdy and actually has pretty good action.  It is neat, however, in that its default position is actually opposite that of most front derailleurs.  Typically, the spring in a front derailleur causes the cage to return to a default position close to the frame, over the inner, smaller chainrings.  As you pull cable, the derailleur moves out away from the frame, towards the higher gears.  For this derailleur, however, the default position is away from the frame, over the high gears, and moves towards the inner low gears as you pull cable.  This has no substantial value to me other than being an oddity:  it simply means it will be easier on the shifter staying in the high gear.

     The front derailleur was not absolutely necessary on Keri's bike, however, because somewhere along the line someone removed the inner chain ring, leaving only the larger "main" chain ring.  I'm not entirely sure what would have prompted this, but it is definitely something I find more than a little irritating.  Tracking down an age-appropriate and correctly sized chain ring could truly be difficult.  But in the meantime, I decided to install the front derailleur so that it can act as a chain guide.  With the chain moving between the gears on the freewheel in the rear, the chain can sometimes want to jump off of the front chain ring.  This is somewhat common, although it doesn't always happen.  It does tend to happen more with reckless shifting, such as "dumping" the chain from the lowest gear to the highest in one motion.  The chains spends more time "in the air" in a shift like this and so is more likely to come off.  Part of what a front derailleur does anyways is keep the chain on the chain rings, so I figured this would be a good idea for Keri's bike.

     Finally, with all of the parts clean, I drove Keri's bike into work on one of my day's off to install everything.  I could have probably done it at home, but it is always such a hassle to pull out my folding stand and do bike maintenance in my living room, between my computer desk and our chairs.  It's worth it to do it in a real shop.  The whole operation went without much of a hitch.  In addition to the obvious expense of cables and housing, I bought a new chain for the her bike.  Her old chain was, well, old, being what I'm pretty sure was the original chain.  But more importantly, it was shortened to work for a single speed drivetrain.  Deciding it was time for a new one, I threw on a SRAM PG-850 8-speed chain that we keep in bulk in the shop.

Various shots of the finished installation.  Everything looks great.
Taken on June 27, 2013
     When everything was said and done, the bike actually came out looking a heck of a lot sharper than it did originally.  I know we are in the middle of a single speed craze, but I will always drift toward a geared drivetrain, if not for practical reasons then for aesthetic reasons.  The much more important satisfaction, however, came from taking Keri out for a test ride shortly after I finished everything.  She was very excited to finally "getting gears," as it has been something she's wanted for well over a year now.  With a yelp of unexpected nimbleness, she took off and had a smile on her face the whole time.  I was a little worried.  She had never used a bike with friction shifting, and although fundamentally it is simple, it is something that can give people trouble at first.  But she caught on like a champ, and after her ten minute ride she exclaimed how much she loved it.  Nothing really beats that feeling of a job well done, especially when that confirmation comes from a loved one.  At the end of the day, this is the kind of mechanic I am.  I just want to make people happy about their bike.

The completed bike, with a 5-speed drivetrain.
Taken on June 27, 2013
     All that is left on Keri's bike is for me to rebuild her rear wheel, as I did with her front.  With the finish line so near I think I'll prioritize this last project for her bike, so that she is completely equipped to get out and have some fun.  I've been partly putting it off because her bike will be out of commission while I am building the wheel, so I want to have all of the funds ready right off the bat.

The bare frame of the Schwinn World that yielded the parts so that Keri's bike could live.
I have plans for it...
Taken on June 27, 2013
     But, more relevant to myself personally, is the now completely stripped Schwinn World frame sitting behind me.  At first I was resolved to quickly donate it, but I've had a change of heart, and I believe I can use it in a project I've been very anxious to make a reality.  There will be more on that to come.

Note:  As in a previous post, I'd like to recommend the website Disraeli Gears as an incredible wealth of knowledge on rear derailleurs.  In addition, I'd also like to recommend this site for providing information on dating bicycle components.  It can be neat to find out when parts of your bike were made.

Finally, this collection of Schwinn catalog scans between the years 1981 and 1990 were (somewhat) useful in dating the Schwinn World.  You may find it useful as well.

Thursday, June 20, 2013

Duality

     At the moment I have a few posts brewing.  I'm not sure if I will continue on the same path that I started for each of them, or even finish and publish any of them.  Right now I am in the middle of a project that has grown quite a bit more intense than I originally speculated:  I'm overhauling my mom's old 1994 ParkPre Team 925R road bike.  That'll warrant a very full post when I'm finished.

A bad photograph of the bike before I started work.  I neglected to take a full side shot of the bike.  Oh well.
Taken on June 18, 2013.
     Instead I'll take this time to share a little half rant, half musing.  Recently I have been experiencing a bit of a minor, not-inherently-bad-for-me identity crisis.  In short, the duality of my interests, which normally coexist in a sort of tag-team tap-out fashion, are butting heads.
     In lamen's terms, my digital, indoor video game side is at odds with my mechanically curious and productive side.  I waste time sitting on my computer, blinking away seconds, minutes, hours and days of video games and mindless web browsing while deep inside of me a greasy fire lusts for actually doing something.  In ideal circumstances, I would just roll my chair from my sweet computer rig over to my fully equipped and expansive work area to start building a bike from nothing, and when I tired of that, I would roll back to my computer to play video games for hours on end.
     Unfortunately, the reality favors one side of that much more than the other.  I have no work area.  Beside my computer I've crammed my tool chest, which is itself crammed with most of my tools.  Beside that is a large tote box filled with my bike part collection.  That's it.  When I rarely do bike work at home, it is usually while sitting in my computer chair, with parts lying on my computer desk--my computer desk with a glass surface!  Boy, it looked cool at Wal-mart but now I am slightly regretting it.  When I need something resembling a work bench I use the linoleum floor of our kitchen.  It gets some of what I need done but it is more than anything frustrating.
     I need a shop.  I need a space, even a somewhat small space, to call my own and to fill with whatever I desire.  Tools, parts, benches, chairs, lighting and of course a decent speaker system.  I need this so bad it drives me insane sometimes.  I would be a much happier and more content person if I had access to this.  But for now, I must endure.

     And so the side of me that needs to work my hands, solve problems and build to create is stifled.  While this never makes me happy, lately it has reached a new level.  It's bothering me.  But it also has me thinking:  "What am I going to do when I do have my dream shop?"
     I definitely want to still try my hand at frame building.  Regardless of how that works out, more than anything I want to tinker.  I want to take apart and rebuild things I normally wouldn't take apart, like shifters.  I want to put parts together to create interesting or useful bikes.  Possibly I could sell these, or I could just do it for the fun and educational value of it.
     One of the big things I have learned from working as a mechanic at a "new" place (that is, a place different from where I learned most of my trade) is that there is more than one way to do something.  There are "proper" ways, "dirty" ways, shortcuts and dumb ways.  I've also begun seeing that there is more than one type of mechanic.  Some people are all about being by the book, following the rules and instructions and seeing the process through in a methodical manner.  Other people are more loose and follow the ebb and flow of the process.  Some people are all about the componentry, how top-of-the-line or new the part is, or how allegedly innovative the company claims the part to be.  Others don't really care, as long as it is functional and gets the job done.  Some people work on bikes because they are serious riders and want every last drop of performance that they can wring out of their machine.  Others, such as myself, find their interest in bicycles in the very nature of it's ingenuity.  It's a machine, that must be manufactured, cared for, and ultimately put to rest.  There is satisfaction in that, otherwise humanity wouldn't be where it is today, regardless of how awesome you may think you are with your iPhone.
     I think I know what kind of mechanic I am.  The trick is staying true to that.  The harder trick still is staying true to that and upholding the tenets of my job.  It's not so difficult that I am strained, just difficult enough to keep me on my toes.
     I just have to keep on trying to grow as a mechanic, to take on new challenges head on, so that I can add "I can't"s to the pile of "I can"s.  It is difficult for me.  I have some serious confidence problems.  My dad always made it look so easy:  nothing ever seemed to make him step away.  He built a whole house seemingly by himself for god's sake!  Sometimes I know I can do it, sometimes I feel I can't.  Duality seems to run deeply in my life.  Prior to very recently I could handle it, if not ignore it.  Nowadays it has been more than I can handle.
     Just got to keep on keeping on.

Tuesday, May 21, 2013

A Bike For Mom

     A lot in this blog thus far has been about my dad, and my relationship and similarities with him.  But, when talking about bicycles and my family, you shouldn't leave out my mom.  She was right there running the bike shop, undeniably fulfilling the more difficult tasks of finances, dealing with vendors and helping the public.  My dad, as talented and skilled as he was, spent a lot of time between closed doors.  Outside of the shop, my mom was a tenacious mountain biker, taking to the trails of Pisgah National Forest nearly every morning. She had several riding buddies who accompanied her on her rides, and even branched out from mountain biking (something my dad never did) and completed a century ride: the Hilly Hellacious in Asheville, North Carolina.

The patch my mom got for the Hilly Hellacious century ride in 1994.  Taken on May 11, 2013
     But by the late '90's my mom got away from cycling.  The closing of our family bike shop forced her to seek full-time employment, and that strain in addition to raising my brother and I eventually took her away from the saddle for good.
     For a few years now my mom has been wanting to get a new bike so that she can "get back into it".  In the interest of her health she's already made some significant changes to her diet and the next step is exercise.  Nothing felt more natural than getting a new bike.  Having recently moved to the Playa Del Ray neighborhood in Los Angeles, she was wanting to get a beach cruiser to hit the nearby bike paths that line the world famous beaches of Los Angeles.  We discussed the sort of bike that would be best for her and quickly settled on a bike which would be internally geared.
Exploded view of a
Sturmey-Archer three
speed hub.  Source
     When most people think of a bike with different gears, they are probably thinking of an externally derailed bike.  This means that the chain is moved from one cog or sprocket to another via a derailleur, which is a mechanism that does exactly what it sounds like it does:  it derails the chain to a new position.  An internally geared hub, on the other hand, has all of the "shifting built into the hub", to use a phrase I often tell customers.  A very watered down explanation of how it works is that a shifter-controlled "clutch" inside of the mechanism transfers the energy created by the pedaling cyclist between three different planetary gearing  configurations which changes the output ratio.  For the common three speed internally geared hubs, there is usually an "underdrive" low gear, a "direct drive" middle gear, and an "overdrive" high gear.
     Only within the past week have I seen the inside of an internally geared hub, and its complicated, clock-like inner workings greatly excite me.  I want to get my hands on an old hub so that I can rebuild it and record the process here, eventually lacing it to a wheel and using it on a casual bike I am planning in my head.  More on that will come, eventually.
     Internally geared hubs are great for several reasons, and somewhat limiting for a few other reasons.  All of the shifting, mechanical movement and delicate parts are completely sealed from the outside world and the elements.  In general, they require very little maintenance, if any at all.  They are also very easy to use, mostly because they can be shifted when the bike is not moving.  This makes them better for stop-and-go urban riding.
     Their drawbacks come from a lack of versatility and a high price.  The most common internally geared hub throughout the ages has been the Sturmey-Archer three speed hub, adorning bikes since the beginning of the twentieth century.  In the past few decades, the three speed hub has budded into a five speed hub, grown to seven and eight, and lately blossomed into Shimano's eleven speed Alfine hub and Rohloff's monster fourteen speed hub.  The prices range from the most simple three speed hub retailing between $150 and $200, up to about $1700 to $2000 for one of Rohloff's tricked out hubs.  (These prices are rough estimations.)

Cut-away illustration of the inside of a Rohloff fourteen speed hub.  Don't worry, I don't know how it works either.  Source
     For my mom's potential bike, we talked about me building one up for her, but after more consideration decided to not go that route.  To put it shortly, there would be little to no financial benefits of me building a bike up from scratch for her.  The truth is that the sort of bike my mom was wanting wouldn't really warrant a custom build due to its simplicity.  She was wanting, and needing, a very simple bike.  This didn't require a special configuration, it required functionality.  There's a lot of bikes out there that could fill this niche for her.  A week before Mother's Day, my fiancee Keri and I got time off of work to go visit my mom and brother in Los Angeles.  Bike shopping was of course on the agenda.
     The first few shops we visited were no good, ranging from helplessly useless to too elitist to talk to us.  The next day, while waiting for my mom to pick us up, I got onto Los Angeles' Craigslist on a whim. After much scrolling, something caught my eye:  a brand new bike, with a step-through frame, three speed internally geared, and at a killer price.  A little more investigation revealed it was actually a small bike shop posting, coincidentally in a neighborhood very close to our destination that day, the Aquarium of the Pacific, in Long Beach.  After our day of fun at the aquarium, we set out to find the bike shop.
     We ended up in a business complex, curiously trying to spot anything that would look like a bike shop.  Lo and behold, one of the storage unit-like store fronts was filled with bicycles.  Inside we found an assortment of affordable bikes and a slew of used bikes.  My mom immediately liked the bike I had picked out for her and after some test rides it was sold.

My mom's bike, setup in my brothers's apartment after my check-over.  Taken on May 7, 2013
     The bike is called the Micargi Kuba 3, and it is an inexpensive lady's city bike, outfitted with a Shimano Nexus three speed internally geared hub.  Being what some people call a "city bike", it is a little more utilitarian and capable of urban riding than a cruiser.  Cosmetically it emulates the old English three speed cruisers from the sixties and seventies, especially in the structure of the fork and fenders.  Most of the bike has very inexpensive and low quality parts, but they are fairly functional and, more importantly, could be upgraded easily if the need ever arose.  The wheels are the modern "road bike" size of 700c and the rims are double-walled, which as explained in my earlier wheel-building post makes them substantially stronger than the cheapest rims out there.  The saddle is some cheap knock-off of the older cruiser style, and will likely be replaced sometime soon when it wears out.  The most valuable and important component on the bike is the rear hub.  Everything else can change if necessary.

Left:  Rear of the bike.  It came with a simple rack.
Right:  Fork and fenders.  Note the chromed dimple on the crown of the fork,
 and the shape of the fender:  directly imitating the old English three speeds.
Both taken on May 7, 2013
     I've tried to do some research on Micargi but all I can find are outdated websites.  It seems Micargi mostly produces department store quality bikes.  While parts of my mom's bike hold up to this standard, I'm still surprised by the overall build of the bike.  Maybe it's just the Shimano Nexus hub, but it feels like it is just a hair above the typical department store bike.
     The important thing is that my mom likes her bike.  She took it out for a ride a week after buying it and reported that she loved it.  Hopefully with time she'll outgrow this bike and it can hang around as a good bike for casual rides and strolls through the park.  For Mother's Day I got her the Mirrycle Bicycle Mirror, which just so happens to be the best bicycle mirror ever.  I bought it a few days before our trip, intending it to be a slight nudge to go ahead and get a bike.  Seems it was all meant to work out.
     My parent's divorce was, by most standards, not a bad one and they remained friends.  Somewhere, wherever or whatever my dad is right now, I bet he's happy to see my mom on a bike again.

Hello!  You can't hate the Mirrycle.  Taken on May 7, 2013

Wednesday, April 3, 2013

Happy Birthday, Dad

   Today, being April 3, 2013, is my dad's 49th birthday.  I felt it only appropriate to make a post celebrating the day, and I felt a good tribute would be talking about what was his (and my mom's) most successful business venture:  Pisgah Bike Center.
Pisgah Bike Center in its original location, during the winter.
Date unknown, probably 1995 or 1996
     On May 2, 1992, Pisgah Bike Center was opened for business on 210 East Main Street in Brevard, North Carolina.  Before my parents acquired the lease to the building, it had been a bakery.  I remember scraping off cartoon bats which had been window painted onto the large front windows.  My guess is that it went out of business around Halloween.  I'm not sure what business occupied the building before the bakery, but it was originally an auto shop.  As you can see in the picture above, there were two large garage sections.  The left garage housed my dad's work area, and the garage to the right was storage for bicycles.  The storage garage even had a pit for changing the oil of a car.  A heavy steel grate had been placed over it, and my brother and I would often fish for quarters and other loose change in the bottom of the pit with a long, flexible grabbing tool we borrowed from my dad's toolbox.

My dad at the register of Pisgah Bike Center, before we officially opened.
Date unknown, probably April, 1992
     In the beginning my parents sold Mount Shasta mountain bikes, which were a cheaper, lower quality subset of bikes made by GT Bicycles.  Eventually my parents were able to secure the rights to sell bikes made by GT themselves, along with Balance and ParkPre, and eventually made it into the "big leagues" via Specialized.  They don't make Mount Shasta, Balance, or ParkPre anymore, if that is any indication of how different it was back then.  Our family bike shop was very successful for a lot of reasons.  The most powerful factors were simply that we were in the right place at the right time.  The mountain bike boom of the late 1980's and 1990's was still going strong, and we had moved to the front-line of one of the best mountain biking regions of the eastern United States:  western North Carolina.  Pisgah National Forest in particular is well known as a mountain biking mecca of the East, and Brevard is right on the southeastern edge of the Forest.  When my parents opened Pisgah Bike Center, we were the only bicycle shop in Brevard.  The closest shop was in Asheville, the cultural center of the Blue Ridge Mountains, about thirty miles away.  Add to that mix my parents strong work ethic and enthusiasm for mountain biking, and you have a winner.

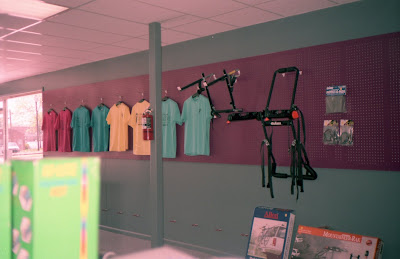
Before we officially opened, waiting on bicycles to arrive.  This wall would eventually contain our lineup of bikes to sell.
Date unknown, probably April, 1992
     I have some memories of this time, but they are not especially concrete or clear.  I was, unsurprisingly, not paying that much attention to the bikes or what my parents were doing.  Most of my time was spent playing in a back room where my parents set up a very tiny TV for my brother and I to watch cartoons.  We would venture out to cause a ruckus in the rest of the store from time to time but when things were busy we were usually scooted to the back.

     I only recall my dad trying to show me how to do some work on a bicycle once.  Being seven or eight at the time I guess I was too hyper to sit and learn something, because all I remember is my dad showing me a set of brakes and explaining how you adjust them.  I didn't understand it but I didn't really pay attention either.  I don't know if I was too young or too preoccupied with trivial, boyhood things like video games or the Power Rangers, but I had no interest in learning what my dad did.  That has always been a tremendous fault of mine:  I've always had my head somewhere else, never in the present and never in what I was doing at the time.

     We had the shop at that location for about four years before tragedy struck.  We were leasing the building from an eccentric elderly lady, whose son managed her various properties.  According to my mom, he was very friendly and easy to deal with.  The elderly lady eventually passed away, so the property was passed to the son who was managing it for her anyways.  Then, he unexpectedly passed from a massive heart attack.  At this point, another son of the elderly lady we hadn't known about comes into town from Virginia and claims his inheritance.  Without us knowing, he sold our property to another local business owner who owned a knickknack shop nearby.  They sold things like porcelain unicorns and glass dolphins.  These new owners appeared on our doorstep on my little brother's birthday in 1996.  They were doubling our rent and forcing us to relocating to a temporary trailer so they could demolish our shop to build a strip mall, from which we could then rent space.  My parents rejected this offer and immediately started looking for a new location.  We only had about a month before the new doubled rent would go into effect.

     Unfortunately, the best location my parents could find in time would end up being the first nail in our coffin.  Whereas before we were located downtown in an easy to find building, we were forced to move to a extremely out of the way residential house on one of the state roads going into town.  We were about two miles from the entrance to Pisgah National Forest, but we were also in the middle of the rural countryside.  No one would think to find a bike shop there.

The second location, before my dad turned it into a store.
Left:  Almost every wall you see here was eventually knocked out.  We also pulled up the carpet.
Right:  Taken from the kitchen, which would be my dad's work area.  The dining room type area would become the office.
Date unknown, sometime in 1996
     My dad knocked down a lot of walls and converted the house into the best store that he could.  His work area got much, much smaller, going into what was once the kitchen.  Thinking back, I don't know how he worked in such a small space.  The basement provided a lot of storage, but it was really too much for what we needed.  We were only at this location for about a year before we were forced to close shop for good.  We were losing money quickly and only our most loyal customers would come to our new location.  After a while, even they stopped showing up.  It was a bad time for our family, laced with uncertainty and doubt after a handful of years of uplifting success.  Other bike shops, some in unbeatable locations, started to pop up in Brevard around this time and we could not compete.

     Even today, my mom still harbors resentment towards the people who had malicious parts to play in those events.  She found out later that the plan to push us out of business had been a calculated move, strung up from one black-hearted person to the next in a web of foul play.  A local outfitters store which also dealt in bicycles wanted us out of business, so they used their friendship with the people who underhandedly bought the property we were leasing to drive us out.  According to my mom, a lot of bad things happened to the people involved in that.  Infidelity legal issues, illegal substance abuse and ill-fated business moves came to those people.  I guess the world has a funny way of working itself out sometimes.

My dad's truck, painted up as an advertisement for our store.  Parked in front of the
small duplex we lived in when we first moved to North Carolina.
Date unknown.
     My mom started to work part time for UPS to help the family, eventually venturing into real estate, and after we closed the shop my dad went to work for a former customer who owned a machine shop.  He quickly distinguished himself as one of the best manual machinists there and made quick friends with just about everyone he worked with.  He worked there until we moved to upstate New York in late 1999, and again in 2000 after we moved back to Brevard.  I think of all the "real" jobs my dad had, where he clocked in and was payed by someone else, the job at that machine shop was probably his favorite.

     My dad held onto a few relics from our time as bike shop owners:  small parts and oddities, things that we hauled to New York, and then to North Carolina again, and finally to Indiana when we "returned home". When I embarked on my first backpacking adventure in 2007, my dad fished out what he said was the last ticketed item from Pisgah Bike Center:  a set of sunglass straps, made of blue cord to look like climbing rope, still in its package with one of our price tickets on it.  I took that to the Uintas of northeastern Utah with me, but I didn't end up wearing my sunglasses for more than a few days so I got little use out of the straps.  They actually broke on me near the end of the trip, no doubt because they were over ten years old at that point, but I was fool enough to throw them away when we got home.  A small mistake, I guess.

     My father of course held onto nearly all of his bike tools.  After I started to become a mechanic, I asked if I could have them for my own use and he gave me nearly all of them.  They are now lying in my wooden tool chest, only a few feet from me now.  They are old and most of them worn; some are so depreciated that they don't even make tools in that style anymore.  Not that they are ancient, they are just relics from a time not too long ago.  I will definitely hold onto them for the rest of my life.  Maybe someday I can pass them on, as they were passed to me.  Hopefully at that time, cone wrenches and lock-ring bottom bracket spanners are still relevant.